Sunday, 26 October 2014

Crafting When We Can Challenge #81

Theme - Black & White

For this challenge our sponsor is 'Lacy Sunshine' & I chose the image
'Cemetarie and Bunny'


I coloured her using IG1, IG2, IG3, IG4 Spectrum Noir's, 
then matted and layered her onto black then silver card.


I made some paper roses & raided my stash for some scary ghosts, bat & skull, added the touch of a red bow and some red gems.

I made a centre-step card with white linen textured card stock.


I hope you like it as much as I do.

I've entered the following challenges:

Crafts Galore Encore Challenge - Challenge #10 Anything Goes
Ladybug Crafts - October Challenge, Autumn or Halloween
Pumpkin Spice - Saturday Challenge #88 Harvest or Halloween
Oddball Art Stamp Co - New Challenge Halloween Spooky Creepy
Artists Inspirations Challenege Blog - Challenge #114 Anything Goes Halloween
Dream Valley Challenges - Challenge #93 Halloween
Creative Moments - Challenge 54 Anything Goes Halloween
C.R.A.F.T Challenge - Challenge 282 Autumn/Halloween/Thanks giving/Bonfire Night
Creative Corner Challenges - Halloween
Outlawz Challenges - Twisted Thursday Anything Goes


Thank You for all your lovely comments, they are really appreciated.


Saturday, 25 October 2014

Wednesday, 22 October 2014

Eye-Scream !!!!!!

Welcome to a brand new challenge
with 

'The Crafter's Cafe Challenge Blog'

Our sponsor this week is Delicious Doodles & I chose the image 'Eye Scream'
& this is what I did with it:


I used the following Spectrum Noir pens:

Cup - BGR1, BGR2, BGR3
Fingers - BG1, BG2, BG4
Tendrils - LG1, LG3
Bone - EB1, EB2, BG6
Blood - CR8, CR9, CR11, DR6
Eyes - TN2, FS1, LG1, LG3

I used a silver gelly roll on the web, but the photo doesn't pick it up.


I added ribbon, flowers, ghost, bat & papers from my stash. I enjoyed making this card as the image isn't something I would usually go for, but I think it worked out well & I'm really happy with the end result.


I entered this card into the following challenges:


Creative Fingers Challenge - Challenge #53
Bearly-Mine Challenges - October Challenge - Halloween
Scrapper's Delights Challenge - Challenge #34 Anything Goes or Halloween
Lacy Sunshine Challenge - Challenge #44 Halloween
The Corrosive Challenge Blog - #210 Halloween


Thanks for taking the time to stop by, your comments are always appreciated.


Sunday, 12 October 2014

Alyce

Crafting When We Can Challenge #80 

'Name It'


It's time for a new challenge and our theme this fortnight is - name it. This week we had our choice of images from our sponsor - The Stamping Chef. & I chose the beautiful image Alyce to play with.


This is what I did with  her -


Ingredients

Spectrum Noir pens to colour her:
Reds - CR6, CR7, CR9, CR11
Greens - LG1, LG2, LG3, LG5
Yellows - GB1, GB3, LY1, LY2, LY3, CT4

Glossy Accents for her eyes & Glitter for her wings

I created the background using 'Worn Lipstick' distress ink as a wash & I coloured the dress & her hair twice so that I could add it after with silicone glue for dimension, and I love it, I've turned her into a Christmas fairy but you could use her for any occasion.


I used some +HunkydoryCrafts papers that was a freebie in this months cardmaking & papercraft magazine to make this a really festive card, and used a matching paper for the inside.


I hope you like it as much as I do.

I've entered this card into the following challenges:

Completely Christmas Challenge - #33 Anything goes + add poinsettia
The Stamping Chef - Challenge #50 Anything Goes
Crafty Sentiments Designs - Anything Goes
My Besties UK Challenge - Anything Goes A
Creative Fingers Challenge - Anything Goes #52


Wednesday, 8 October 2014

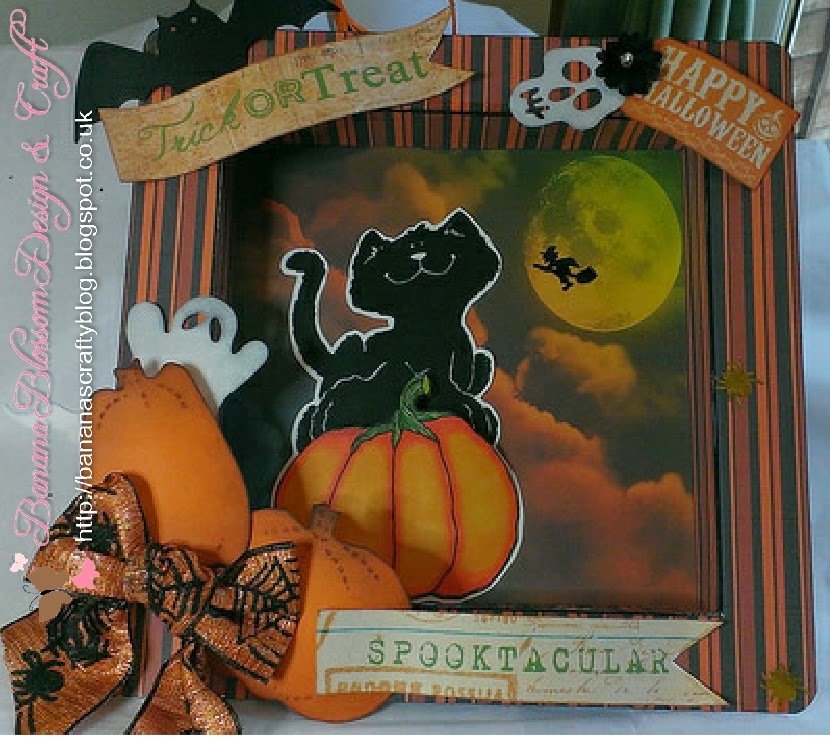
Pumpkin Kitty

The Crafters Cafe Challenge

Theme - Black, Orange & one other colour, I choose white so I can add my ghost.

Welcome to my 1st project as a new design team member for 'The Crafters Cafe Challenge', this week we are sponsored by the fantastic 'Eureka Stamps' and I chose 'Pumpkin Kitty' & this is what I did with her:


I used the following spectrum noir pens:

true black - Kitty
OR1, OR2, CR10 - pumpkin
CG2, CG4 - stalk.

I coloured the pumpkin twice and decoupaged it on top of the original image for added dimension. This is one of those projects that has a life of its own, it started out as a card in my head but it ended up as a shadow box, it just grew larger & larger all by its self  *#{ SPOOKY }#*

 I used digital Halloween papers from 'Stitch Bear'  to cover the shadow box I made. I love the background paper with the dark clouds and the moon and couldn't resist adding the little witch on her broom, it adds depth. I added pumpkin, ghosts, skull & bat from my stash.

and Taaah Daaah - finished project, I hope you like it.


I've entered the following challenges:

Crafty Girls Challenges - Challenge #28 Anything Goes
Crafty Sentiments Designs Challenge - Anything Goes
Through The Craft Room Door - Anything Goes Oct 7 - 13
Bearly Mine Challenges - October Halloween
Ouitlawz Challenges, Twisted Thursday - Anything Goes


Thanks for stopping by


Tuesday, 7 October 2014

Manly Monday

Featured Card......


I made this card last month for my husbands birthday & I was contacted by a lovely lady who writes a blog called Manly Monday and she asked if she could feature my card. 

We all know how difficult it is to make male friendly cards so to find a blog that features them is a bonus & gives us all some ideas.

So here's a link to Cindy's blog, so please pay her a visit and leave a nice comment.

Thank You Cindy.


Friday, 3 October 2014

Money / Gift Card Wallet Tutorial

Wallet Tutorial.


These are so useful at Christmas & Birthdays and they are a good size too.


Ingredients:

Using A4 card stock cut - 1 piece of card 14cm x 23cm, 1 piece of card 11cm x 6cm  & two 6cm x 6cm
Using A4 contrasting paper cut 2 pieces measuring (2mm less than) 14cm x 7cm, 1 piece (2mm less than) 14cm x 9cm & 11cm x 6cm

Velcro dots
red tape
wet glue 
ribbon
toppers
sentiments


Step 1.

Take the 14cm x 23cm card and with the 23cm side against the top of your score board score at 7cm & 16cm, then burnish with your bone folder.

Step 2.


Take all your cut pieces (exept the two 6cm x 6cm pieces) and round all the edges


Step 3.


Glue the contrasting papers to the inside of the wallet

Step 4.


Take your two 6cm x 6cm squares and score at 2cm, 3cm, 4cm & 5cm, fold in a consentina (mountain & valley folds) then put red tape on both ends and attach to the bottom of the inside of the wallet & fold up to make a purse.


Step 5.


Use the 11cm x 6cm card and paper to make a tag to place in the purse for your message.


Then have fun decorating.


Thanks for stopping by, I hope you enjoy making these, I did !


Related Posts Plugin for WordPress, Blogger...